
When to use what
| Distance / volume | Best option |
|---|---|
| Inside a factory, up to a few hundred metres | Belts and pipes – no fuel, no stations, up to 1 200/min per Mk.6 belt |
| Medium distance, moderate volume, rough terrain | Tractor / Truck – cheap stations, any fuel, follows a Vehicle Path |
| Long distance, high volume, many item types | Train – 32 slots or 2 400 m³ per car, unlimited cars, up to ≈ 2 250 items/min per car |
| Long distance, small volume of valuable parts | Drone – 9 slots, flies straight over everything, 100 MW per port |
Road vehicles
| Vehicle | Slots | Max. km/h | 0→50 km/h | Consumption (MW) | Unlock | Automatable |
|---|---|---|---|---|---|---|
 Tractor (“Sugarcube”) Tractor (“Sugarcube”) |
25 | 69 | 6.7 s | 55 | Tier 3 – Vehicular Transport | yes |
 Truck (“The Unit”) Truck (“The Unit”) |
48 | 89 | 4 s | 75 | Tier 5 – Logistics Mk.4 | yes |
| Fluid Truck (1.2) | 3 200 m³ (wiki) | 89 | 4 s | 75 | Tier 5 – Logistics Mk.4 | yes, Fluid Truck Station only |
 Explorer Explorer |
12 | 107 | 1.8 s | 90 | MAM Quartz – The Explorer (10 Crystal Oscillator, 100 Modular Frame) | yes |
| Cyber Wagon | 1 | 164 | – | 150 | AWESOME Shop 20 Coupons | no |
| Factory Cart / Golden | 1 | 50 | 2.3 s | no fuel | AWESOME Shop 10 / 50 Coupons | yes (own path type) |
- All motor vehicles (except the Factory Cart) burn any fuel from Leaves to Plutonium Fuel Rods. Consumption per minute of driving =
MW × 60 / MJ; e.g. a Truck on Coal (300 MJ) burns 15 Coal/min. Consumption only counts while accelerating or driving, not when standing or rolling downhill. - Runtime per unit of fuel = MJ / MW. Anchors for the Truck (75 MW): Coal 4 s, Solid Biofuel 6 s, Compacted Coal 8.4 s, Packaged Fuel 10 s, Packaged Turbofuel 26.67 s, Battery 80 s, Packaged Rocket Fuel 96 s, Packaged Ionized Fuel 133.33 s, Uranium Fuel Rod 10 000 s (2 h 47 min). A Battery stack (200 → 1.2 GJ) is the best non-nuclear fuel per stack.
- Vehicles protect from fall damage, poison gas, radiation and all creatures except Stingers; they kill creatures when driven over them.
Truck Station and Vehicle Paths
 Truck Station: 16 × 22 × 12 m; 3 belt inputs (left: fuel; middle 2×: cargo), 2 belt outputs; 48 slots; not overclockable; mode load or unload. Docking takes 8 s, then all stacks that are not actively growing transfer. Power 20 MW while a vehicle is in range, otherwise 0.1 MW. Fluid Truck Station (1.2): 1 belt input (fuel) + 2 pipe in + 2 pipe out.
- Refuelling: same fuel type only, only as much as one round trip needs; “Replace Differing Fuel” swaps foreign fuel out.
- Vehicle Paths (1.2) are built single-lane paths (types Factory Cart, Explorer, Tractor, Truck, Fluid Truck, Universal); 180° turning circle 4 m (Cart), 8 m (Explorer/Tractor), 18 m (Truck/Fluid/Universal); only on smooth terrain or foundations; Y-splits and merges allowed; crossings act like block signals; trucks have priority, otherwise “longest wait first”; at least 2 Truck Stations per path. Before 1.2 routes were recorded while driving (Q).
- Bottleneck rule: cargo per round trip ≤ slots × stack size; the loading station must not empty faster than its supply (buffer with a Storage Container).
Trains
| Element | Key figures |
|---|---|
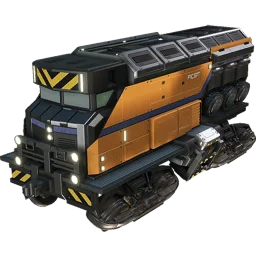
 Electric Locomotive Electric Locomotive |
6 × 16 × 6 m, 300 t; max. ≈ 120 km/h; 2 000 kN at 110 MW; power 25 MW minimum (also standing) to 110 MW, regenerative braking up to 33 MW (net up to +8 MW); build cost 5 Modular Frame, 10 Motor, 20 Steel Pipe, 20 Rubber, 50 Wire |
| Freight Car | 6 × 16 × 6 m; 32 slots or 2 400 m³ (1.2; 1 600 m³ in 1.0) – never both; one fluid type per car; empty 30 t, full 100 t; coupled only on build |
 Train Station Train Station |
34 × 16 × 20 m; 50 MW permanently; directional; rails conduct power |
| Freight Platform | 48 slots; 2 belt in + 2 out; 50 MW during transfer (else 0.1 MW); load or unload; transfer 27.08 s (all cars at once), belts blocked meanwhile |
| Fluid Freight Platform | 3 200 m³ (1.2); 2 pipe in + 2 out; head lift lower outlet 10 m (real 12 m), upper 14 m (real 16 m) |
| Railway | segment 12–100 m; 1 Steel Pipe + 1 Steel Beam per started 18 m, then per 12 m; min. 90° curve radius 17 m; max. slope 28 m over 94.5 m (1:3.375); up to 3 branches per switch |
- Unlock: Tier 6 – Monorail Train Technology; signals: Tier 6 – Railway Signalling.
- Automation needs a timetable with ≥ 2 stations; only a locomotive at the front in travel direction drives; use a locomotive at both ends for bidirectional trains (the autopilot does not reverse). Recommendation: 1 locomotive per 4 cars. On a 1 m ramp (7.125°) one locomotive pulls 1 644 t (44 empty / 18 half / 13 full cars); on a 2 m ramp (14.03°) 800 t (16 / 7 / 5).
- Signals: a Block Signal turns red when the next block is occupied; a Path Signal reserves a path through a block (crossings) and only admits a train that can also leave the block. Block size ≥ the longest train; 300–400 m is typical; trains brake ≈ 250 m before a red signal. Trains and their passengers are immune to all damage; collisions derail (re-rail with E).
- Throughput: time to fill a car
TtF = stack × 32 / belt rate + 0.4513 min; if the round trip is longer than TtF the car is full andthroughput = stack × 32 / round-trip time. Maximum per car with 2 × Mk.6 (2 400/min): stack 50 → 1 431/min, 100 → 1 793/min, 200 → 2 053/min, 500 → 2 248/min; fluids → 979 m³/min (1 958 with 2 × Mk.2 pipes). Because of the 27 s lock, buffer with Industrial Storage Containers in front of and behind platforms.
Drones
| Element | Key figures |
|---|---|
 Drone Drone |
9 slots; 16 × 6 × 3 m; take-off and landing 51 s each; cruise speed by fuel (below); build cost 4 Motor, 10 Alclad Aluminum Sheet, 1 Radio Control Unit, 2 AI Limiter, 1 Portable Miner |
 Drone Port Drone Port |
24 × 24 × 15 m; 100 MW permanently; 2 belt in (cargo + fuel), 1 belt out; 2 × 18 slots (out/in); exactly 1 home drone per port, any number of visiting drones |
| Fuel | Energy (MJ) | Speed (m/s) |
|---|---|---|
| Packaged Fuel | 750 | 50 |
| Packaged Turbofuel | 2 000 | 60 |
| Battery | 6 000 | 75 |
| Packaged Rocket Fuel | 7 200 | 75 |
| Uranium Fuel Rod | 750 000 | 90 |
| Packaged Ionized Fuel | 10 000 | 100 |
| Plutonium Fuel Rod | 1 500 000 | 100 |
- Unlock: Tier 8 – Aeronautical Engineering. Only these fuels work (contrary to the in-game text). A drone flies strictly home port ↔ 1 destination port on a 64 × 64 grid with obstacle avoidance; loading does not block the belts (unlike trains).
- Throughput ≈
9 × stack / (2 × flight time + 102 s). Example: 2 km with Batteries (75 m/s) → 2 × 26.7 s + 102 s = 155 s → stack 100: 348/min. Worth it for small amounts of valuable parts over large distances.
Hypertube and misc.
- Hypertube (Tier 4): 1 Copper Sheet + 1 Steel Pipe per segment, entrance 10 MW; accelerates to 50 km/h without input; chained entrances (“Hypertube cannon”, 4 m support spacing) reach 54 / 65 / 79 / 95 / 114 km/h with 1–5 entrances and > 500 km/h with more. Tubes protect from aggro, out-of-bounds damage and gas – not from radiation.
- Jump Pad (5 MW, 0–90° in 5° steps) and U-Jelly Landing Pad (5 MW, prevents fall damage from any height): Tier 2 – Jump Pads.
- Personnel Elevator (1.1): 4–200 m, 25 stops, 20 MW while moving.
Routes in the planner
A route in SatisfactoryBase is one vehicle, an ordered list of wagons (the consist) and a circuit of two or more stops. Each stop points at a station in one of your factories and says, per wagon, what happens there: load, unload or ignore. You configure the factory, not the train – the site works out which wagon carries what, in which direction, how much per minute, what the station and the route are called, and where it does not add up.
Create one
- On the map, right-click a factory → Connect from here…, then click the second factory.
- Pick Vehicle in the dialog (Belt is the straight belt/pipe link).
- For each side choose an existing station or New station… with a vehicle type. For a tractor, truck or drone you also pick Load / Unload and the item; a train gets its wagons afterwards in the route settings.
- The line above the buttons tells you what will happen: Creates a new route · Train, or Adds a stop to route X when the station you picked already belongs to one. Both stations of a route must use the same vehicle type.
Connecting a third factory to a station of an existing route appends a stop, and the circuit closes back to the first station – three stops mean three legs, including the way back.
Use it in a factory
Open a factory and drag a machine output (or input) onto the station card. Item, wagon, direction and rate come from the factory's own solved plan; you are only asked when it is genuinely ambiguous, e.g. when several wagons carry that item. A train station without wagons is called …-PASS and warns that it has no freight operations – add wagons in the route settings.
Route settings
Reachable with one click from every station of the route (station card header, station dialog, the map's connection panel, the overview's Transport panel):
- Stops in schedule order, drag or use the arrows, add and remove stops (a drone route always has exactly two).
- Consist: wagons, their item, freight or fluid, and the order – which applies to every stop.
- Actions per stop: the wagon × stop matrix with load / unload / ignore and an optional fixed rate.
- Vehicles: how many vehicles run the route (and locomotives per train), plus the estimated capacity and utilisation per wagon.
- Problems: shortages, capacity limits, wagons nothing ever fills, stations whose factory has not been solved yet. They are hints, never blockers.
- Renaming: names are generated from biome, resource and role (
RD-IO-LOAD, Rocky Desert Line); type your own to override it, clear it to go back.
Where routes show up
- Map: each leg is a dashed line in the vehicle's colour, labelled
Route · Stop 1 → 2; selecting one highlights the whole route, and a circuit of three or more stops runs one vehicle marker around the loop. - Overview: all legs of one route share a colour and carry its name; the Transport panel says which route a leg belongs to and opens the route settings.
Older pairwise station links keep working: they become two-stop routes the next time the workspace loads, without losing any cargo.
In short, a vehicle link between two factories or stations carries the vehicle type (Tractor / Truck / Train / Drone), item and amount and is drawn as a route on the map (Using SatisfactoryBase).